Rust Server Components
I didn't want to get lost in the maze of popular frameworks like Next.js, so I chose to do something crazy: I wrote my solution in Rust.
It's still slightly complex, but I can outline it right here in this blog article. Can you say the same for Next.js?
Do you mean you created your own version of Next.js?
Absolutely not! That would need a tremendous amount of work, and I simply worked on it in my spare time. I wanted to learn more about Rust and experimented with it by creating something I could use in real life: a webserver.
I consider this the Rust equivalent of T3 Stack. I did not create a framework; instead, I grabbed existing libraries and added some glue between them.
The goal
I know you're excited to dive in, so let me show you what it looks like.
A "Rust Server Component" renders this blog page:
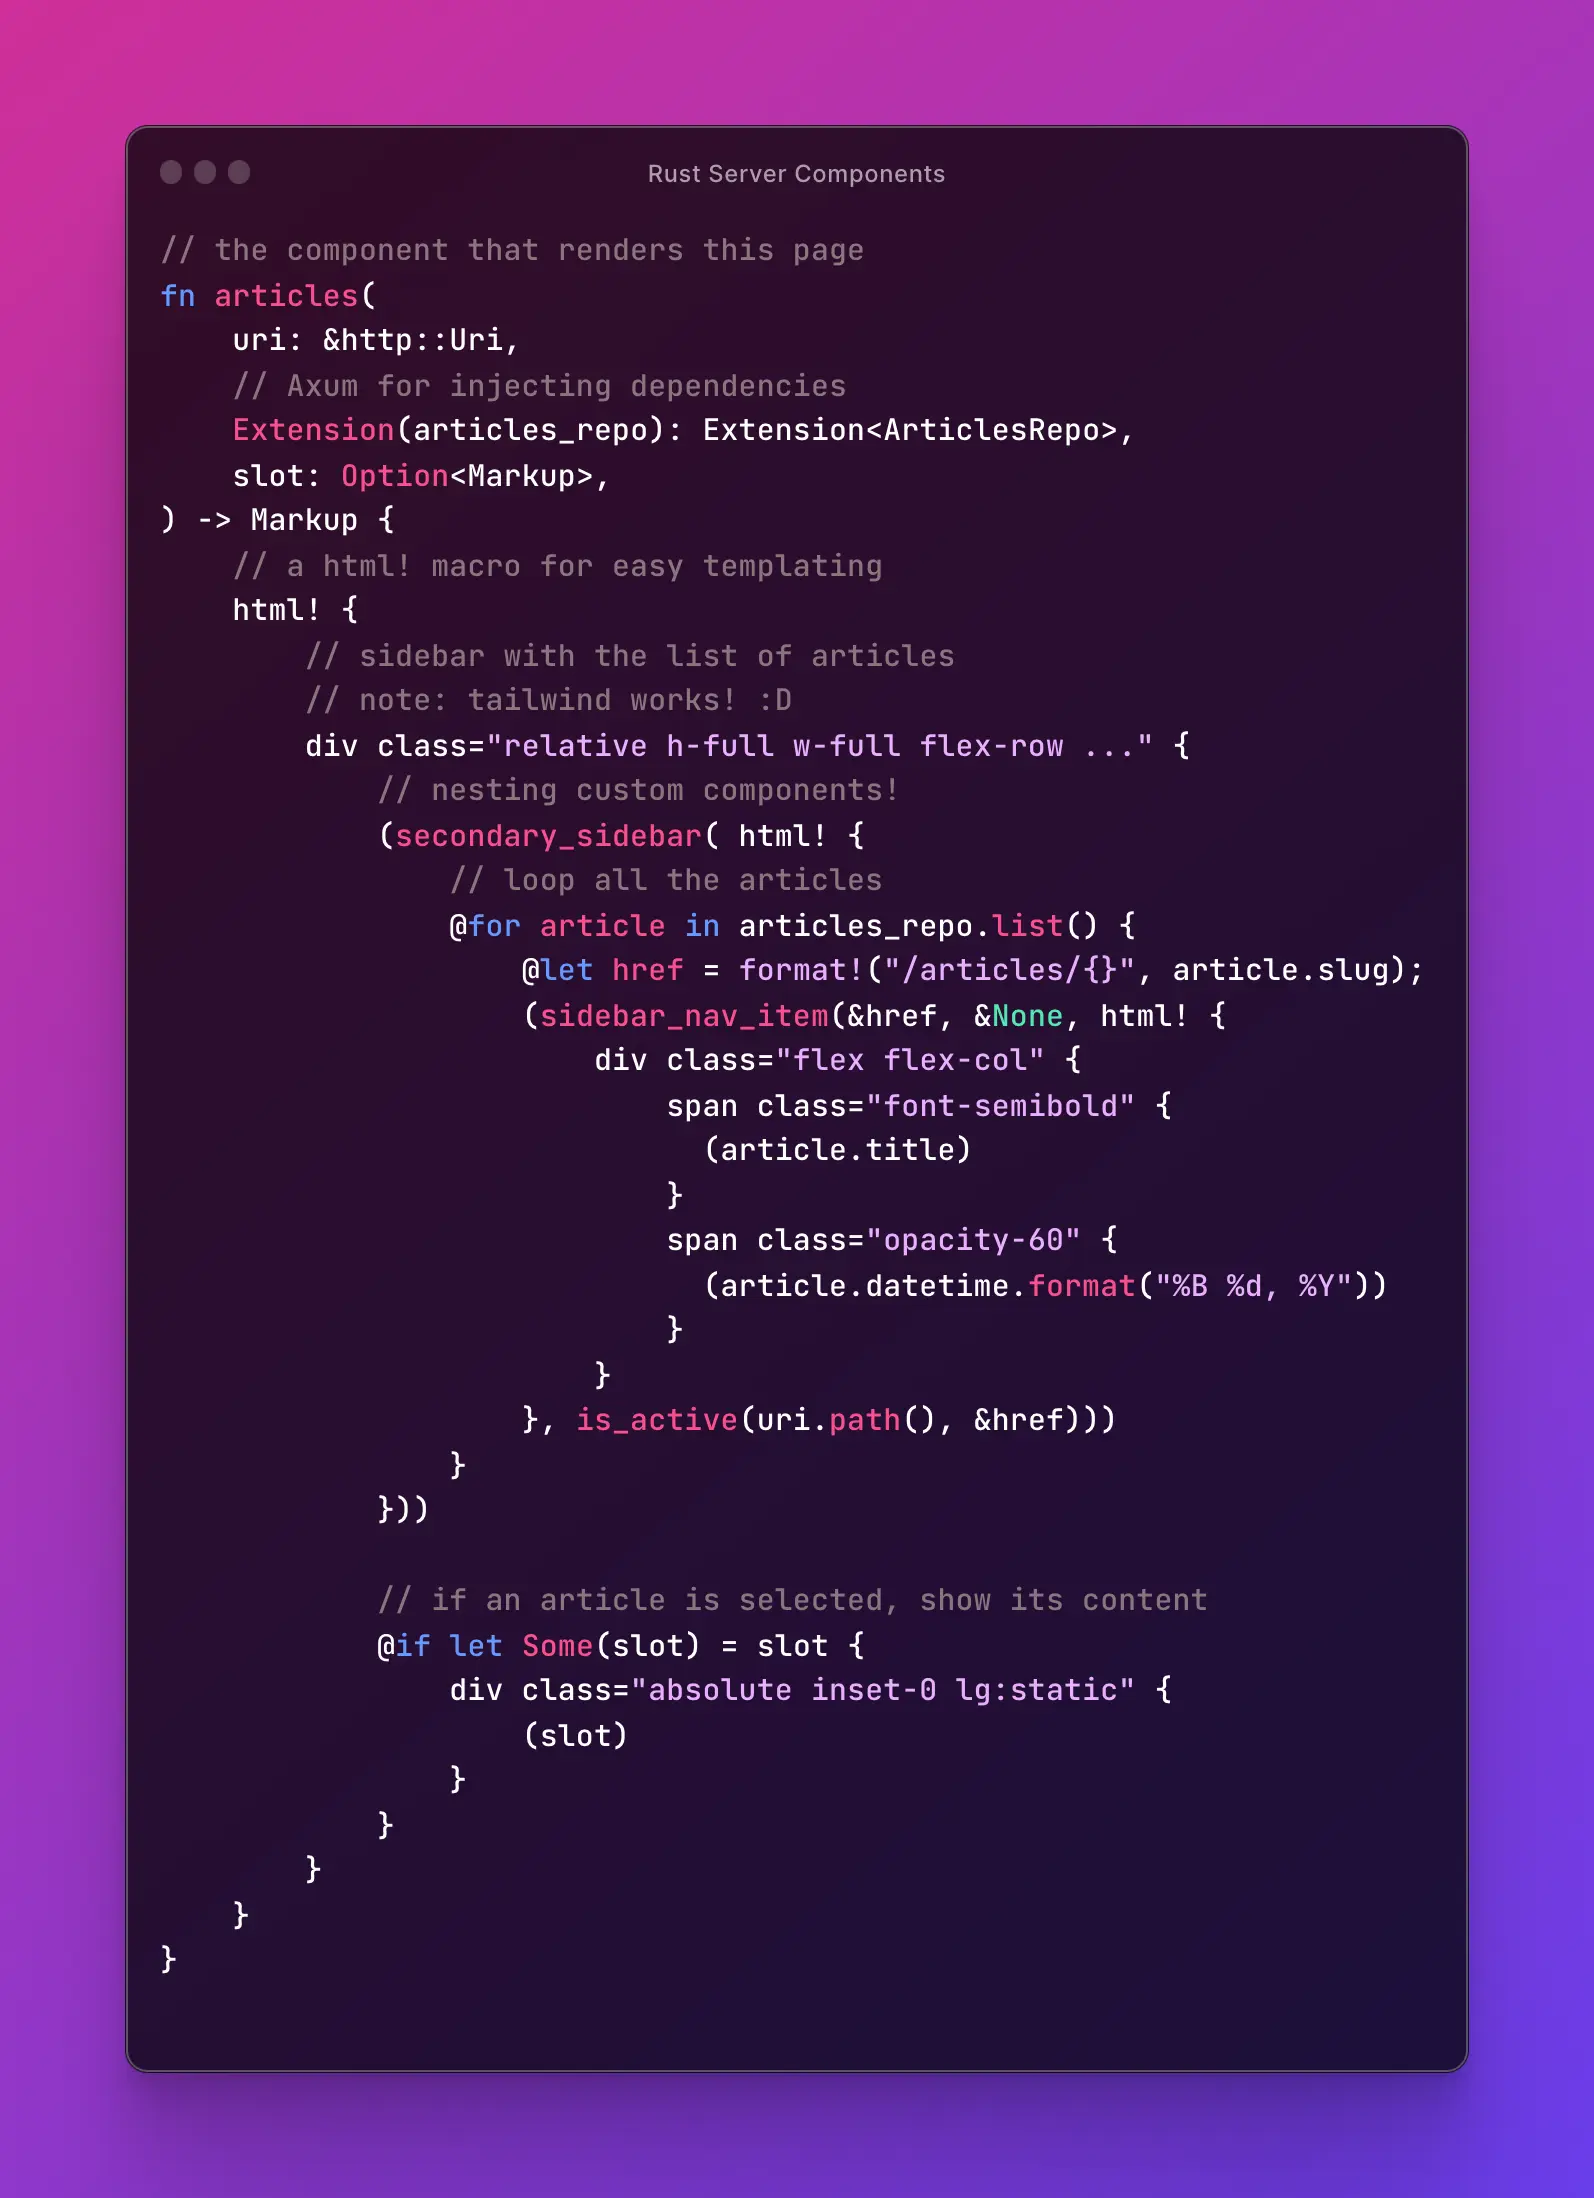
While the main text of this blog is written in Markdown, I have added a few unique components:

I'm really pleased with the outcome, so let's go!
Old school server-side rendering
Remember when internet pages were just HTML files that traveled through the internet? Those days, sure. Well, they're not over yet! We just made it more complicated than a soap show season end. If you're new to frontend development, you might be tricked into thinking that you need Node, JavaScript, React, or similar tools to build a website.
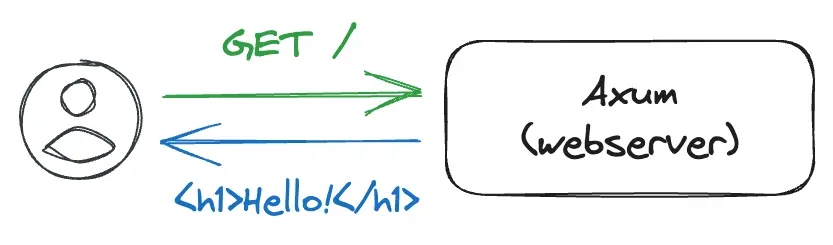
Let us begin our journey, by writing the simplest of the webservers:
#[tokio::main]
async fn main() {
    let app = Router::new().route("/", get(handler));
    let addr = SocketAddr::from(([127, 0, 0, 1], 3000));
    axum::Server::bind(&addr)
        .serve(app.into_make_service())
        .await
        .unwrap();
}

async fn handler() -> impl IntoResponse {
    Html("<h1>Hello!</h1>")
}
Before creating a basic website, such as a blog, the next natural thing to do is to experiment with format!() to eliminate duplicated HTML:
#[tokio::main]
async fn main() {
    let app = Router::new()
        .route("/page1", get(page1))
        .route("/page2", get(page2));
    let addr = SocketAddr::from(([127, 0, 0, 1], 3000));
    axum::Server::bind(&addr)
        .serve(app.into_make_service())
        .await
        .unwrap();
}

async fn layout(content: String) -> String {
    format!("
<h1>A fancy website title</h1>
{content}
    ")
}

async fn page1() -> impl IntoResponse {
    Html(layout("<h1>Page 1</h1>"))
}

async fn page2() -> impl IntoResponse {
    Html(layout("<h1>Page 2!!!</h1>"))
}
I'll refer to methods like layout() as components. Because, when you think about it, that's all they are:
// A JSX component
function Nuts({ count }) {
    if (count < 0) {
        return <p>You cannot have negative nuts</p>;
    }
    return <h1>{count} nuts</h1>;
}
is equivalent to:
// A Rust Server Component
fn nuts(count: i64) -> String {
    if (count < 0) {
        "<p>You cannot have negative nuts</p>".into()
    } else {
        format!("<h1>{count} nuts</h1>")
    }
}
Server components
Recently, Next.js and React have been pushing for RSC (the real ones, React Server Components).
The server finally renders the JSX component into an HTML string, just as I did in the previous section.
JSX provides significantly superior DX than format!(), however I've discovered Maud, a pure gold crate. (I discovered Maud thanks to Xe Iaso's site source code).
It's not as good as writing JSX, but it's still not terrible.
The best part is that you can't make mistakes like forgetting to close a <p> otherwise your code will fail to build.
Since we're introducing a new dependency, I'd want to remind you of the project's philosophy: understanding what's going on at all times.
Maud is simply a nicer version of format!() that looks like this:
// A Rust Server Component with Maud
fn nuts(count: i64) -> Markup {
    // You can still put some logic here, if you want.
    // However, Maud templating conveniently supports if,
    // let, match, and loops.

    html! {
        @if (count < 0) {
            p { "You cannot have negative nuts" }
        } else {
            h1 { (count) " nuts" }
        }
    }
}
If Maud is just a fancier format!(), why the function now
returns Markup instead of String?
Markup is a String, but it's also a way to express a string that contains
HTML. By default Maud will escape strings contents. Returning Markup
directly is easier for nesting Maud components.
The ability to have control flows like if-s and loops straight into your template is what makes Maud so powerful. More information is available on the official website.
Last but not least, Maud's Render trait.
By default, Maud will render components into HTML using the standard Display trait. Types can customize their output by implementing Render.
This is useful for creating our own components:
struct Css(&'static str);

impl Render for Css {
    fn render(&self) -> Markup {
        html! {
            link rel="stylesheet" type="text/css" href=(self.0);
        }
    }
}
Markdown components
Now that we've learned how to design custom components, let's create another useful one: a markdown renderer.
For that, I will add a new crate to our tool belt: comrak.
Once you have comrak, defining such a component is simple:
use comrak::{markdown_to_html, ComrakOptions};

pub struct Markdown(pub String);

impl Render for Markdown {
    fn render(&self) -> maud::Markup {
        let options = ComrakOptions {
            ..comrak::ComrakOptions::default()
        };
        let html = markdown_to_html(&self.0, &options);
        maud::PreEscaped(html)
    }
}
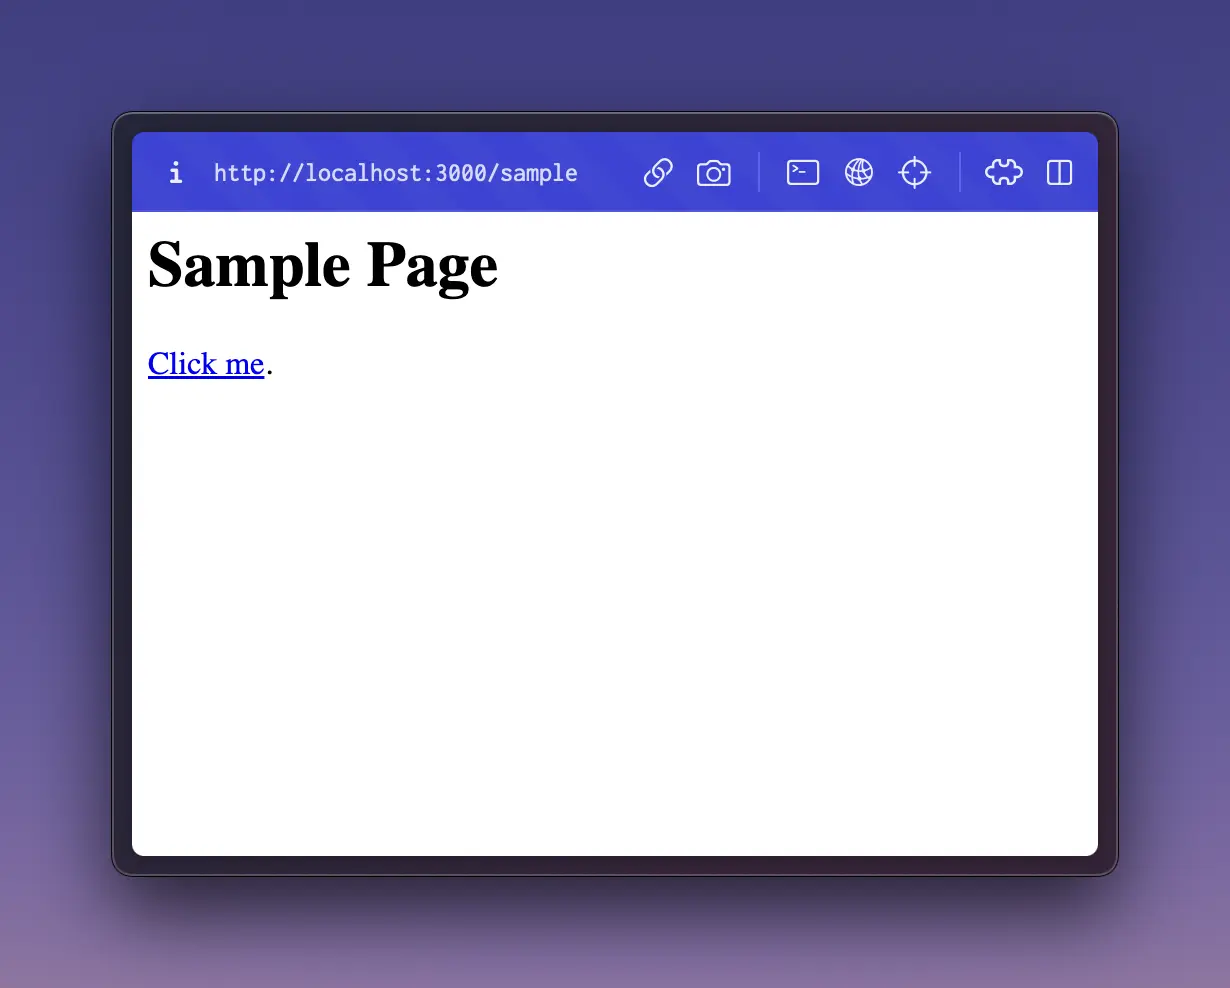
And now we can easily put together a whole webpage:
pub async fn page() -> Markup {
    // load content from a file, a database, ...
    let content = "[Click me](https://www.youtube.com/watch?v=dQw4w9WgXcQ).".to_string();

    html! {
        h1 { "Sample Page" }
        (Markdown(content))
    }
}
Check out this lovely outcome, which shows how far we've come:
MD...X?
MDX enables the usage of JSX in markdown documents. For my blog, I wanted something similar.
Are we the reason you wanted custom components?
Bingo. For example, here is our source code:
<dialog character=raisehand pos=left msg="Are we the reason you wanted custom components?"></dialog>
<dialog character=bulb pos=right msg="Bingo. Here is our source code: <pre><code>stack overflow</code></pre>"></dialog>
To achieve that, I've added a new crate: lol-html. CloudFlare developed this to power its Workers:
Low Output Latency streaming HTML rewriter/parser with CSS-selector based API.
lol-html is essentially a clever search-and-replace for HTML.
You can search using CSS selectors and replace using the API that they offer.
First, you set up a rewriter, then you feed it with your HTML stream.
Let's see an example of replacing all <a href="http://..." with a https version:
let mut output = vec![];
let mut rewriter = HtmlRewriter::new(
        Settings {
            element_content_handlers: vec![
                // match all <a>
                element!("a[href]", |el| {
                    // extract their href
                    let href = el
                        .get_attribute("href")
                        .expect("href was required")
                        // put an s in that http
                        .replace("http:", "https:");

                    // replace the href value
                    el.set_attribute("href", &href)?;

                    Ok(())
                })
            ],
            ..Settings::default()
        },
        |c: &[u8]| output.extend_from_slice(c)
    );

// lol-html is built from streaming content really, so you can feed chunks to
// the rewriter
rewriter.write(b"<div><a href=")?;
rewriter.write(b"http://example.com>")?;
rewriter.write(b"</a></div>")?;
rewriter.end()?;

assert_eq!(
    String::from_utf8(output)?,
    r#"<div><a href="https://example.com"></a></div>"#
);
We can create a more generic version of the above that accepts a component and applies the specified Settings:
use maud::{Markup, PreEscaped};

pub fn apply_rewriter<'s, 'h>(settings: Settings<'s, 'h>, html: Markup) -> Markup {
    let mut output = vec![];
    let mut rewriter = HtmlRewriter::new(settings, |c: &[u8]| output.extend_from_slice(c));
    rewriter.write(html.0.as_bytes()).unwrap();
    rewriter.end().unwrap();
    PreEscaped(String::from_utf8(output).unwrap())
}
Let's build a EnhancedMd component that wraps a Markdown component and calls apply_rewriter() to its output:
pub struct EnhancedMd(pub Markdown);

impl Render for EnhancedMd {
    fn render(&self) -> Markup {
        apply_rewriter(
            Settings {
                // define an <alert msg=xxx> component
                element_content_handlers: vec![
                    // match <alert>
                    element!("alert", |el| {
                        let msg = el.get_attribute("msg")
                            .expect("msg attribute is required");

                        // replace the entire <alert> tag with our
                        // maud component
                        el.replace_comp(html! {
                            div style="background: red; padding: 10px;" {
                                (msg)
                            }
                        });
                        Ok(())
                    })
                ],
                ..Settings::default()
            },

            // apply the rewriter to the Markdown component itself
            html! {
                (&self.0)
            },
        )
    }
}

// add a convenient replace_comp() to lol-html's Elements so that we can pass
// Markup components directly instead of wrestling with Strings
pub trait ComponentReplacer {
    fn replace_comp(&mut self, comp: Markup);
}

impl ComponentReplacer for Element<'_, '_> {
    fn replace_comp(&mut self, comp: Markup) {
        self.replace(&comp.0, ContentType::Html);
    }
}
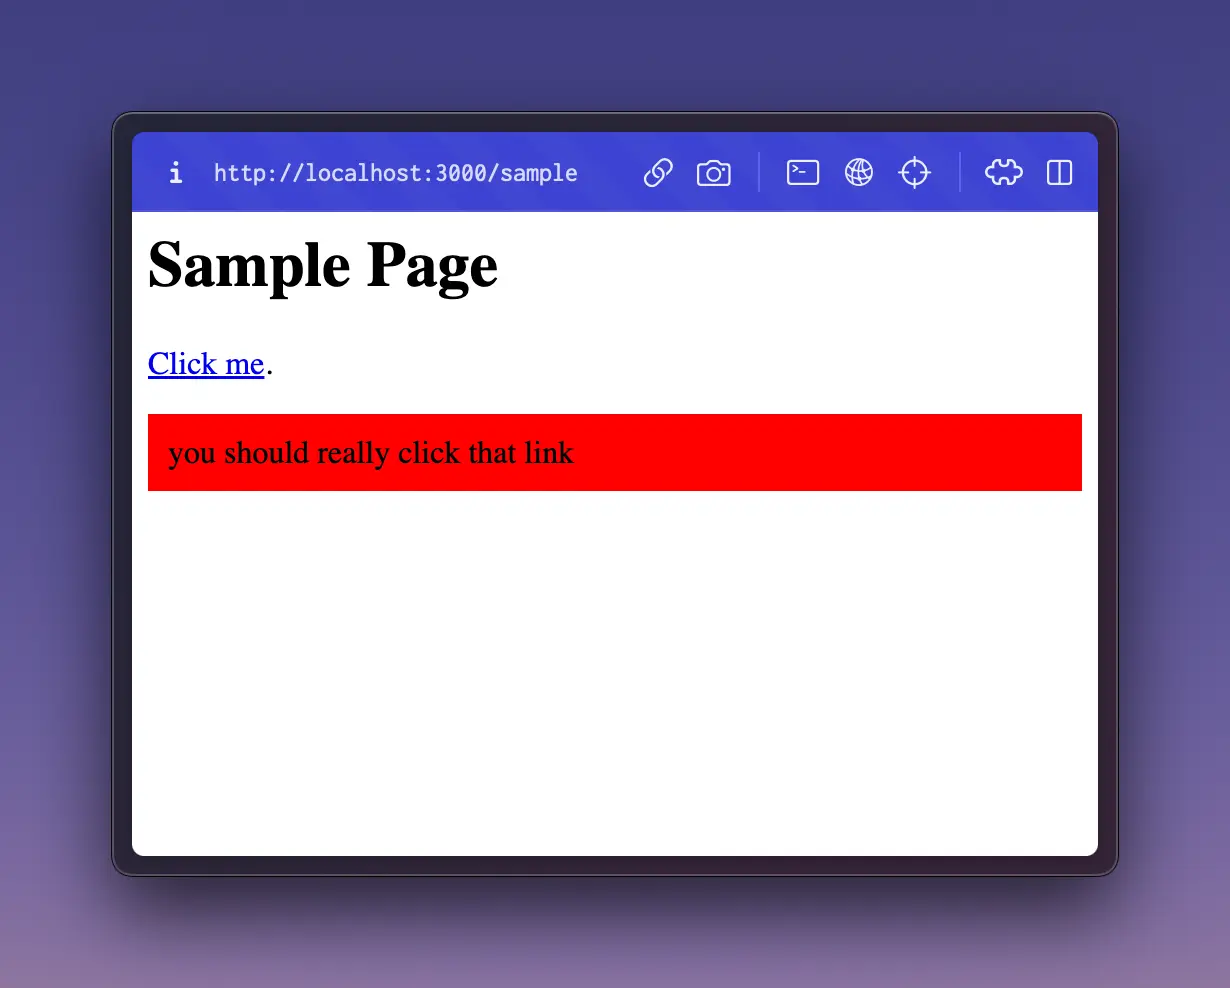
I hope I didn't bore you with implementation details; the usage is much more straightforward:
pub async fn page() -> Markup {
    let content = r#"
[Click me](https://www.youtube.com/watch?v=dQw4w9WgXcQ).
<alert msg="you should really click that link"></alert>
        "#.to_string()

    html! {
        h1 { "Sample Page" }
        (EnhancedMd(Markdown(content)))
    }
}
Unfortunately due to the streaming-oriented nature of lol-html, I was
unable to utilize it to replace components' inner content. You may create a
component that looks like this: <alert msg=foo></alert>;
but not <alert>foo</alert>.
Going interactive
It's fine and simple to create some static-ish content. Loading your markdown content from a file or a database is the most dynamic thing you can do currently.
But how about some real interactivity for your users? I wanted to build the <3 button in the top-right corner for my website! (By the way, if you're enjoying this post, now may be a good time to click it! However, a login is necessary.)
I'm going to start by creating the structure for an interactive page. Here's a counter, like most frameworks do as a demo:
use maud::{html, Markup};

static mut COUNTER: u32 = 0;

pub fn counter() -> Markup {
    // fetch data from a real db instead of accessing global state
    let c = unsafe { COUNTER };

    html! {
        div {
            p { "Counter:" (c) }
            button { "Increment" }
        }
    }
}

pub async fn page() -> Markup {
    html! {
        h1 { "Sample Page" }
        (counter())
    }
}
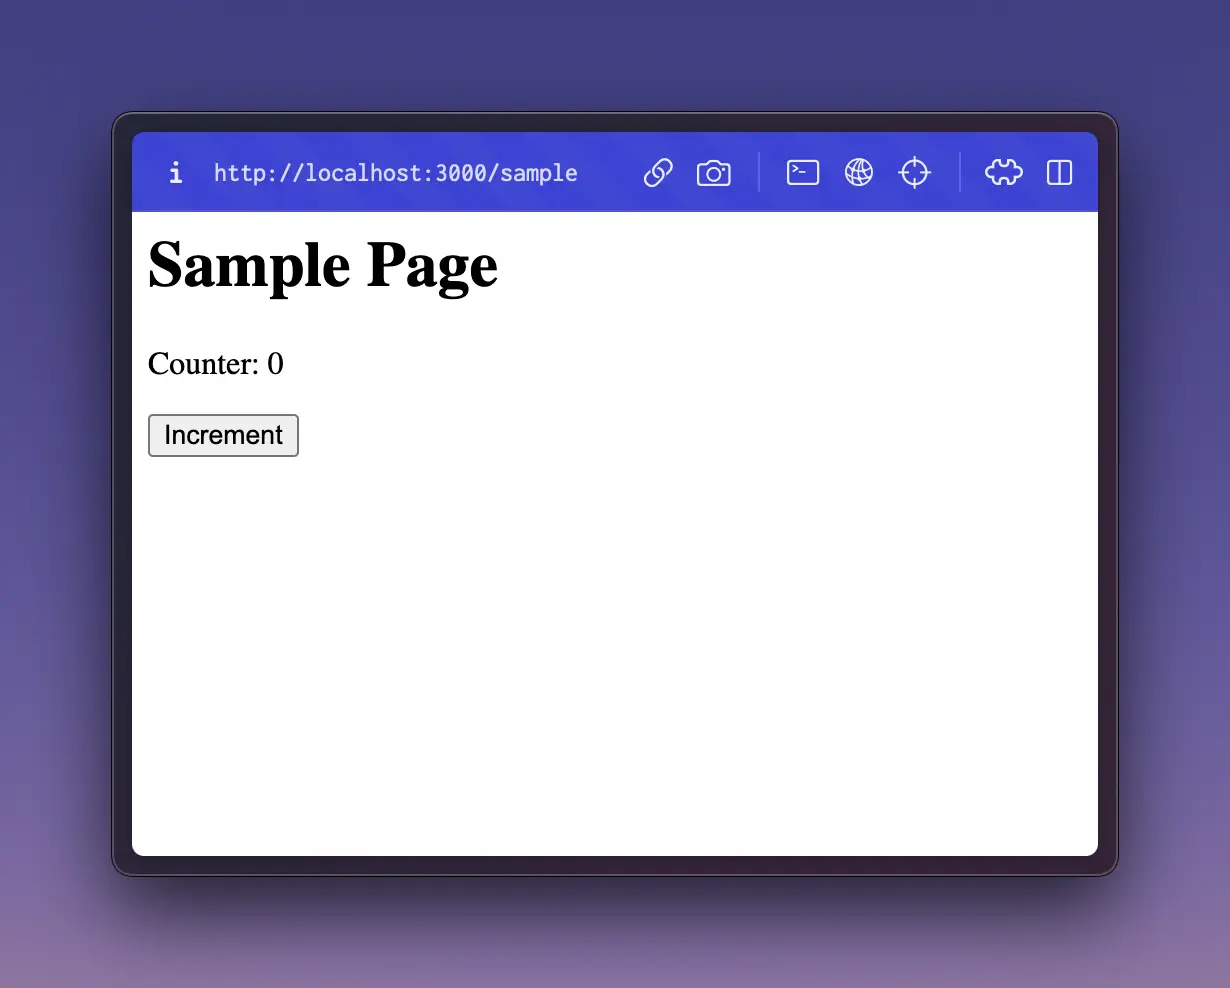
Clicking the button doesn't do anything, yet.
We'll be using the htmx JavaScript library, which has lately received a lot of popularity. And we'll make our component interactive by writing the proper amount of JavaScript: zero.
When the user hits the button, it'll send a POST /components/counter/increment request to our server, which updates the counter in its global state and returns the modified HTML for the updated counter.
Let's register a new counter_increment() route handler in our Axum's router. For the response, we can reuse the function counter() we defined earlier.
// register new routes specific to this component to the axum router
pub fn register(router: Router) -> Router {
    router.route("/components/counter/increment", post(counter_increment))
}

static mut COUNTER: u32 = 0;

pub async fn counter_increment() -> Markup {
    // update state
    unsafe { COUNTER += 1 };

    // return updated HTML
    counter()
}

pub fn counter() -> Markup {
    let c = unsafe { COUNTER };
    html! {
        div {
            p { "Counter: " (c) }
            button { "Increment" }
        }
    }
}

pub async fn page() -> Markup {
    html! {
        h1 { "Sample Page" }
        (counter())
    }
}
We can easily test our new endpoint with curl:
$ curl -XPOST http://localhost:3000/components/counter/increment
<div><p>Counter: 1</p><button>Increment</button></div>

$ curl -XPOST http://localhost:3000/components/counter/increment
<div><p>Counter: 2</p><button>Increment</button></div>
Sweet. To make it interactive, let's add a "on click" event that sends the same HTTP request and swaps its content with the response:
pub fn counter() -> Markup {
    let c = unsafe { COUNTER };

    html! {
        div {
            p { "Counter: " (c) }
            button
                // target: element that will be replaced
                hx-target="closest div"

                // method and url of the request
                hx-post="/components/counter/increment"

                // since it's a button, htmx by default will set the trigger
                // to be on click

                { "Increment" }
        }
    }
}

pub async fn page() -> Markup {
    html! {
        // add htmx from a CDN
        script src="https://unpkg.com/[email protected]" {}
        h1 { "Sample Page" }
        (counter())
    }
}
And just like that, it works:

This is not an htmx lesson. I just wanted to show the benefit of using the same code (counter()) on both a "regular page" and an htmx endpoint.
We also set the ground for where I'm going next, suspense...
Building <Suspense />
I could have stopped there and been happy with what I had learned about Rust, Axum, and all the tools I used. However, I liked seeing things in a different way so much that I didn't want to stop.
The Suspense component in React is usually used to show a fallback component (like a waiting state) while the real component is still being rendered on the server.
In my blog, I didn't want to wait for the database query that gives the number of likes to stop the whole page from loading. It doesn't matter to me for SEO anyway, so it can wait until later.
Consider our earlier counter() component; imagine retrieving that number from a third-party service taking 500ms. After the crucial content, we should let the client fetch the counter() component lazily.
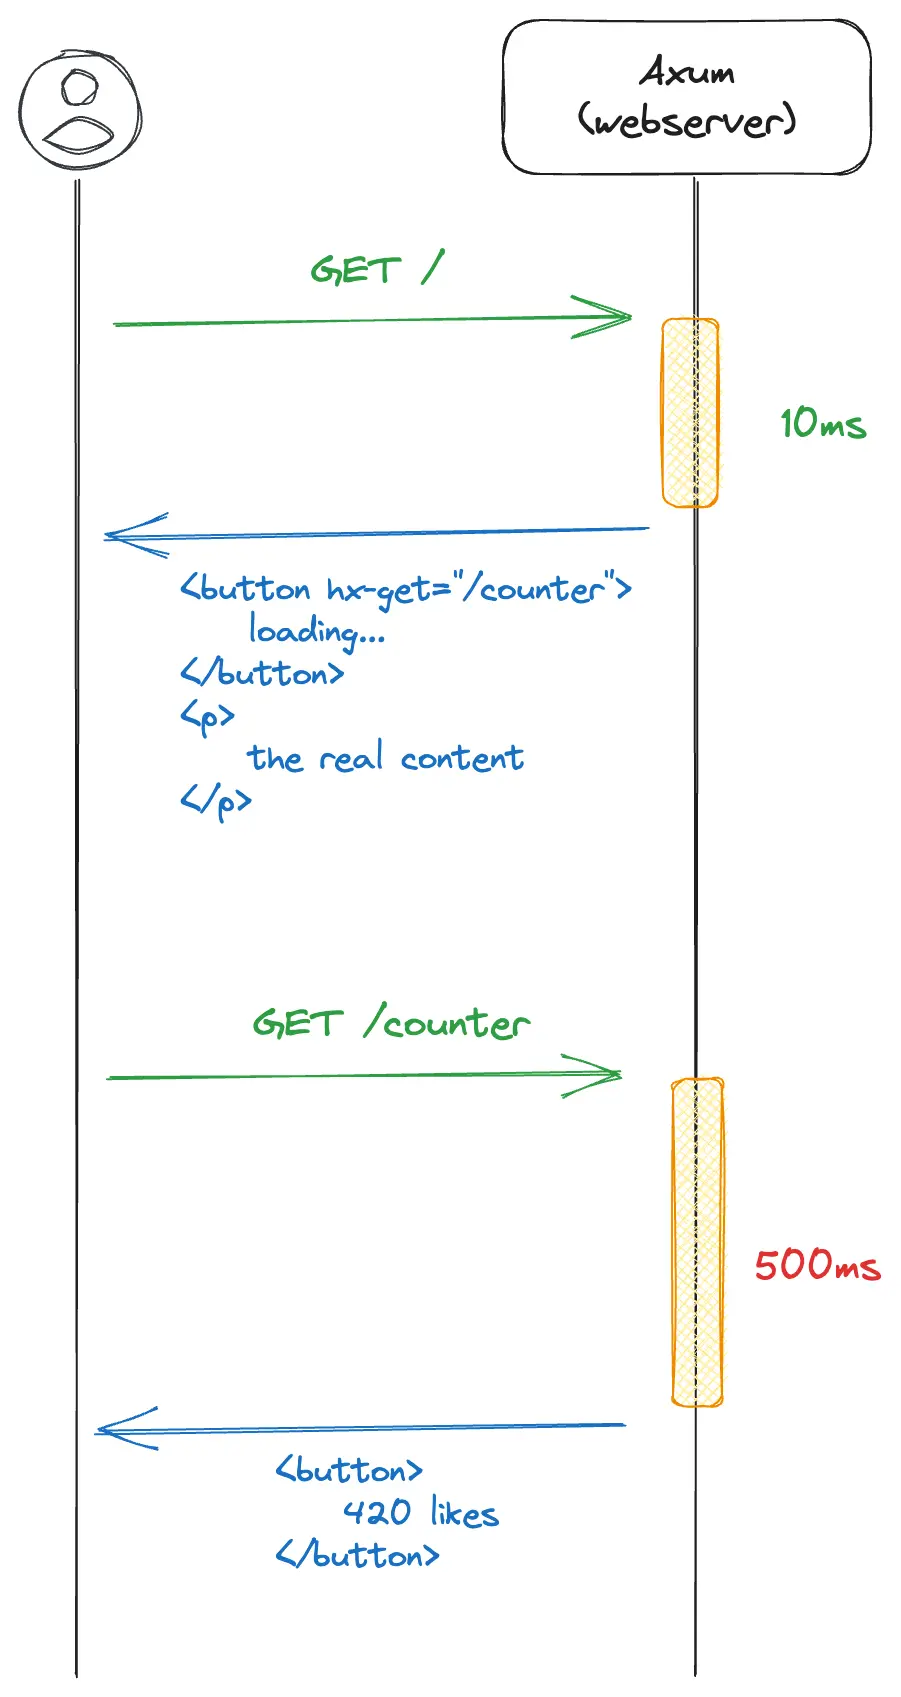
We can use htmx, and it's much simpler than you may imagine. First, I'll create a new GET /components/counter route that just returns the counter component:
pub fn register(router: Router) -> Router {
    router
        .route("/components/counter", get(counter_get))
        .route("/components/counter/increment", post(counter_increment))

}

pub async fn counter_get() -> Markup {
    counter()
}
And, because we don't want to render counter() any longer, let's replace it with a placeholder div that will trigger the GET request as soon as the page is ready:
pub async fn page() -> Markup {
    html! {
        script src="https://unpkg.com/[email protected]" {}
        h1 { "Sample Page" }
        // this div will be replaced as soon as the page loads
        div hx-trigger="load" hx-get="/components/counter" {
            p { "Counter: loading" }
        }
    }
}
At this point, you may try inserting a sleep() function within counter() to check whether the remainder of the page (i.e. the title and loading text) would render immediately without being slowed down by your sleep.
Write your own suspense() component to keep things tidy!
pub fn suspense(route: &str, placeholder: Markup) -> Markup {
    html! {
        // this div will be replaced as soon as the page loads
        div hx-trigger="load" hx-get=(route) {
            (placeholder)
        }
    }
}
Future work
I didn't want to get too deep into implementation specifics in this article. I wanted to share with you on my "build your own thing" philosophy.
My own website is now developed in this manner, and the source code is available at: https://github.com/Pitasi/univrs.
I'm not distributing it as a "library" or "framework". If there is significant interest, I can provide boilerplate repositories or components as a starting point. It's critical to me that any piece being used it's easily interchangeable.
Being able to develop any sort of logic I wanted was the best part about this approach. As a final point, here's how I automatically select the best image format to serve (e.g., AVIF, WEBP, JPG,...) depending on what's contained in the image folder itself:
// path is something like "dir/picture.jpg"
pub fn static_img(path: &str, alt: &str, class: &str) -> Markup {
    // `search_available_sources` will access filesystem to find
    // other variants: dir/picture.avif, dir/picture.webp, ...
    // They will be sorted by their actual size on the filesystem.
    let sources = search_available_sources(path);
    if sources.is_empty() {
        panic!("couldn't find any image source for {}", path);
    }

    let (fallback, sources) = sources.split_last().unwrap();

    html! {
        picture class="contents" {
            // best formats first
            @for source in sources {
                source
                    srcset=(format!("/{}", source.path()))
                    type=(source.mime_type());
            }

            // fallback
            img
                src=(format!("/{}", fallback.path()))
                class=(class)
                alt=(alt)
                loading="lazy"
                decoding="async";
        }
    }
}
If you enjoyed this article you can find me on X: @zaphodias, Mastodon: @[email protected] or LinkedIn.
I never take things personally and value any constructive criticism that helps me learn something new!
Cheers 🖖